I’ve been backing my homelab up with duplicacy (See Backing Up the Cluster Using Duplicacy), but I’m fed up with it returning a 0 exit code even if there’s a problem with the backup. This makes me have to do a lot of annoying rummaging through log output to be sure that a backup actually worked, so I decided to switch to restic.
In this blog entry, I’m going to explain how to create a jail in TrueNAS, mount directories you want to back up into the jail, install restic, and how to use it to back up to Backblaze b2.
Background
I’m tired of worrying about whether I found all the possible duplicacy error messages, or made a mistake in one of the regexes for the errors I have seen. I want my backups nice and boring so I don’t go to do a restore and find out “Oops! We had a new failure mode you hadn’t seen before, so the backups haven’t been working for three months, too bad about your data!”
My work had a holiday shutdown, so I decided it was past time to switch to a better backup system. Of course I’m going to keep running the old crappy one for a couple of months in parallel because I don’t want to find a problem with the new one after three months of usage when I do my next restore test. You do test your restores periodically, I hope.
I’ve been running TrueNAS Core (formerly FreeNAS) long enough that I’ve upgraded to larger drives in the zpool three times. I picked it because FreeNAS fully supported ZFS, I could buy a chassis with 4 hot-swap bays, I could buy it from the company that makes the software, both to support the open source project and to ensure that I had fully supported hardware.
Can I build a server from parts? Sure, I’ve done it before. Do I want to build a server from parts and have to fight with a bunch of different vendors if something goes awry? Oh hell no, especially for the server with all my photos on it. I opted to minimize my hassle factor, support the FreeNAS project, and only have to deal with one vendor in case of any hardware issues. I bought a 4 bay FreeNAS mini, and have been happy with it for 7+ years.
Anyway, enough background on the server I’m backing up.
Why restic?
restic is:
- Open Source
- Works on macOS, Windows, Linux and (most importantly for TrueNAS) FreeBSD
- Written in
go, so it’s a single binary blob and we don’t have to worry about installing a bunch of dependencies inside the jail - Does data deduplication and compression on your backups. Since we pay Backblaze based on space usage, this reduces the backup cost
Why Jails?
TrueNAS Core is based on FreeBSD, so the native way of running software in an isolated environment are jails (one of the inspirations for docker containers). I could run it in a docker container, but that would burn more resources because I’d have to run it in a docker vm.
Why B2?
I’ve been using Backblaze b2 for years. It has a s3-compatible API so a lot of s3-aware applications work with it easily, Backblaze only does storage so I don’t have to worry about it going away, and last but definitely not least, it only costs 20% of what the same amount of data would cost to store in S3.
restic supports a lot of other storage back ends (including local disk), but I’m only going to discuss b2 here.
All that said, let’s get down to it.
Set up B2
First, create an account at Backblaze.com.
Now that you have an account, you’ll need to create a bucket to store your backups in. Log into your account and click Buckets in the sidebar on the left, then Create a Bucket. Give your new bucket a unique name, make sure it’s set to private (which should be set by default), and click create.
You’ll also need an application key that restic can use to connect to b2.
Do not use your master application key! You should restrict restic to just the bucket you want it using - don’t give it power over your entire backblaze account. Click App Keys at the bottom of the sidebar, then Add a New Application Key, give it a name (I used restic-key), select the bucket you just created from the Allow access to buckets dropdown menu, and create the key. Copy the key into your password manager, it’ll only be displayed once. Copy the keyID too, you’ll need both of them when we configure restic.
Create a jail for restic
Use the TrueNAS wizard to create your restic jail.
- Log into your TrueNAS webui
- Click Jails.
- Click add. You should see something similar to
- Give it a name (make life easy for yourself and don’t include spaces or any special characters other than
-), leave the jail type as default, select whatever the highest FreeBSD version is showing available in the release drop-down menu, then next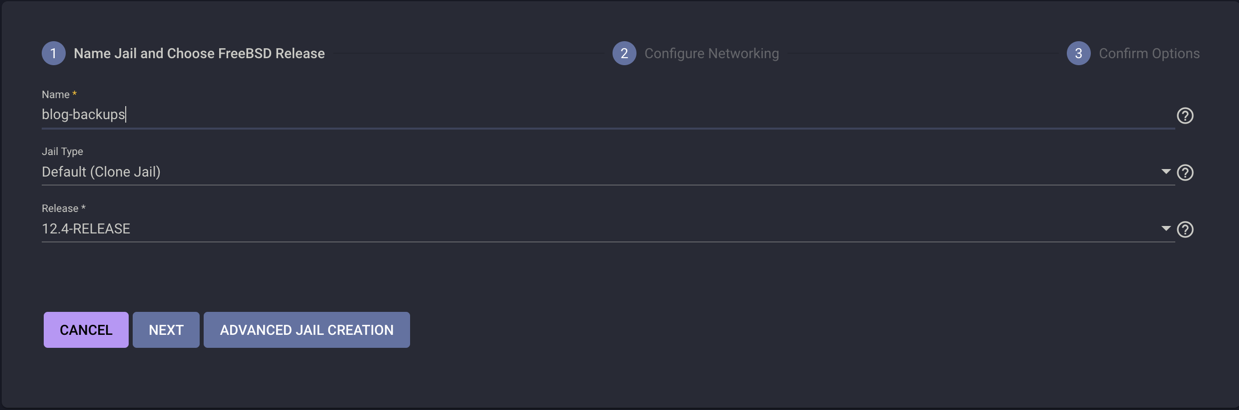
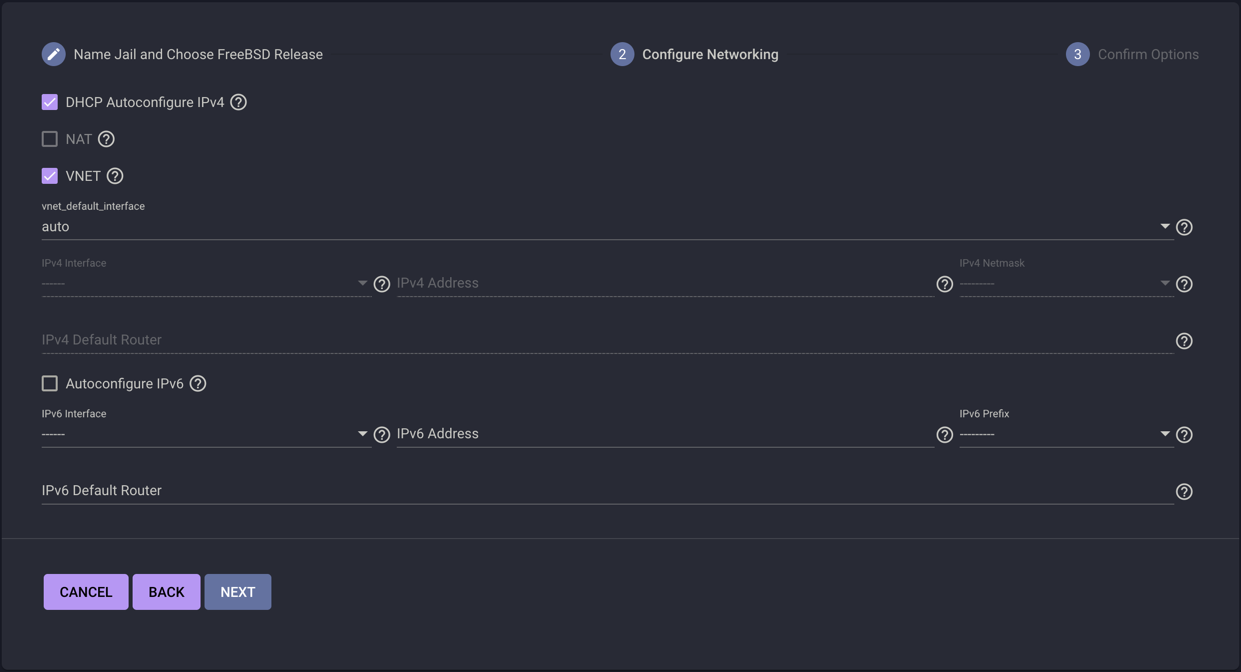
- It’s going to need network access, so click DHCP Autoconfigure, and if it doesn’t automatically populate the VNET checkbox, enable that too, then next
- It’ll show you a summary of your settings that should look something like
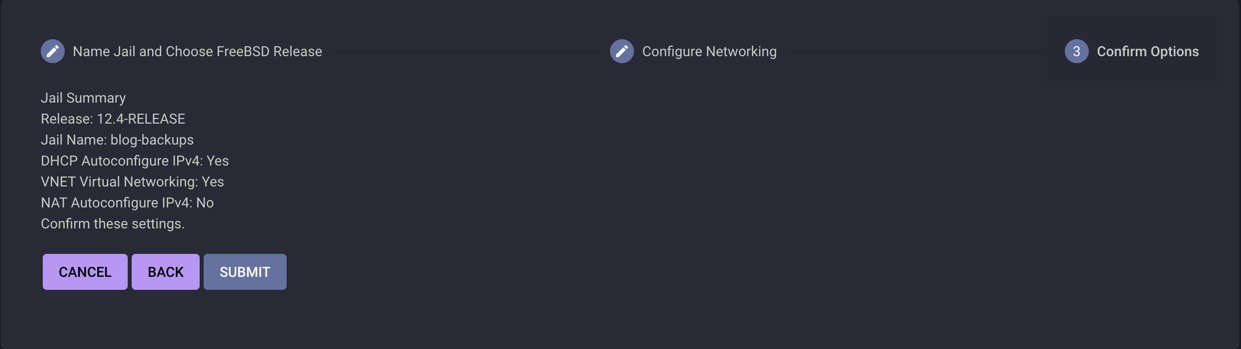 click submit to create the new jail.
Add Mount Points
By default, your jail can’t see any directory trees outside itself. That’s great for security, but not so great if we want to back up files outside the jail, so we’re going to add some mount points.
Add the mount points before you start the new jail - you can’t add them to a running jail. You can stop the jail, add/remove mount points, then restart it, but it’s easier to set them up before starting the jail.
Select your new jail, and select add mountpoint 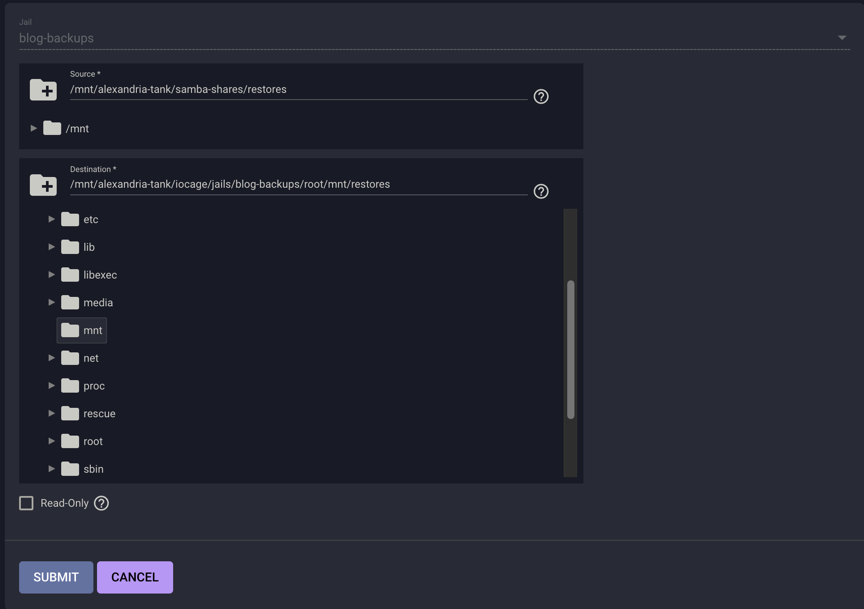 .
.
You can either make individual mounts for the directories you want to back up, or you can make one for your whole zpool. Whichever you pick, I recommend setting them read-only so you can’t accidentally restore an older version of a file over the current version.
Make a directory outside the jail to store configuration files and to restore files to, and don’t set it read-only. Segregating the config/restore directory to a separate mount point will make it easier to examine restored files before putting them back where they belong.
Now that you have your mount points added to your jail, go ahead and start your jail. It should take less than a minute to start.
Install restic
Now that the jail is running, you’ll have to install restic into it.
sshinto your TrueNAS server- Enter the jail so you can install software by running
sudo iocage console YOURJAILNAME pkg install ca_root_nss restic
Configure restic & do your first backup
For convenience, I store the various settings as environment variable exports in a shell script that I can source for a couple of reasons:
- This makes it easy to do the backups via
cronand also to do test backups and restores from within the jail. - I don’t have to write a config file parser and overcomplicate things
Install the driver script and config files
ssh into your TrueNAS server and stick the following files in a directory visible inside your backups jail.
Here’s the restic-driver script I use to run restic and trim snapshots once they age out.
#!/usr/bin/env bash
#
# restic-driver-script
#
# License: Apache 2.0
# Copyright 2023 Joe Block <jpb@unixorn.net>

set -o pipefail

if [[ -n "$DEBUG" ]]; then
  set -x
fi

function debug() {
  if [[ -n "$DEBUG" ]]; then
    echo "$@"
  fi
}

function fail() {
  printf '%s\n' "$1" >&2  ## Send message to stderr. Exclude >&2 if you don't want it that way.
  exit "${2-1}"  ## Return a code specified by $2 or 1 by default.
}

function has() {
  # Check if a command is in $PATH
  which "$@" > /dev/null 2>&1
}

function show_params() {
  debug "BACKUP_PATHS: $BACKUP_PATHS"
  debug "EXCLUDE_FILE: $EXCLUDE_FILE"
  debug "DRY_RUN: $DRY_RUN"
  debug " "
  debug "Retention settings:"
  debug "Minimum snapshots $MINIMUM_SNAPSHOTS_RETAINED"
  debug "Hourly snapshots: $HOURS_RETAINED"
  debug "Daily snapshots:  $DAYS_RETAINED"
  debug "Weekly snapshots:  $WEEKS_RETAINED"
  debug "Monthly snapshots:  $MONTHS_RETAINED"
  debug "Yearly snapshots:  $YEARS_RETAINED"
}

if ! has restic; then
  fail "Can't find restic in $PATH!"
fi

# Our first argument is the settings file to source to get our backup
# parameters, so peel it off - we'll pass all the other arguments directly
# to restic
PREFS_F="$1"
shift
if [[ ! -r "$PREFS_F" ]]; then
  fail "Can't load $PREFS_F"
fi

source "$PREFS_F"
show_params

# If you're backing up a filesystem that you're mounting by FUSE, the inode
# information is misleading at best, so add --ignore-inode.

restic backup --verbose=2 \
  --exclude=.duplicacy \
  --exclude=.DS_Store \
  --tag periodic \
  -o b2.connections=15 \
  $EXCLUDE_FILE $DRY_RUN $BACKUP_PATHS $@

if [[ $? != 0 ]]; then
  fail "restic backup failed" # We don't want to prune any snapshots if this backup failed
fi

# Prune backup snapshots
restic forget --verbose \
  --tag periodic \
  --group-by "paths,tags" \
  --keep-last $MINIMUM_SNAPSHOTS_RETAINED \
  --keep-hourly $HOURS_RETAINED \
  --keep-daily $DAYS_RETAINED \
  --keep-weekly $WEEKS_RETAINED \
  --keep-monthly $MONTHS_RETAINED \
  --keep-yearly $YEARS_RETAINED

if [[ $? != 0 ]]; then
  fail "restic snapshot cleanup failed"
fi
Here’s an example settings file for it:
#!/usr/bin/env bash
#
# Here are our backup settings
#
export B2_ACCOUNT_ID='your_b2_account_id'
export B2_ACCOUNT_KEY='your_b2_key'

# Use different directory prefixes for each backup repo
# so they can share a bucket without interference
export RESTIC_REPOSITORY='b2:your-restic-backups-bucket:dir-prefix'

# This is used as the encryption key for your backups. If you lose it,
# you won't be able to restore anything. I keep a copy of mine in my
# 1Password vault
export RESTIC_PASSWORD='your-encryption-key'

# If you want to exclude some directories from your backups, list
# them in an exclude file and set EXCLUDE_FILE
export EXCLUDE_FILE="--exclude-file=example-excludes"

# Uncomment if you only want to dry-run and not actually write any data
# to the backup repository
#export DRYRUN='--dry-run'

# What paths do we want to back up? Remember to use the paths as seen inside
# the jail, not the paths as seen in your TrueNAS environment
export BACKUP_PATHS="/mnt/path-inside-jail/share /mnt/path-inside-jail/anothershare"

# How many snapshots do we want to keep around?
export MINIMUM_SNAPSHOTS_RETAINED=4

export HOURS_RETAINED=48
export DAYS_RETAINED=14
export WEEKS_RETAINED=8
export MONTHS_RETAINED=12
export YEARS_RETAINED=5
And here’s an example excludes file - it’s a list of paths to directories and files we don’t want to back up - I don’t back up my downloads or installers directories since that’s all stuff I can re-download later if necessary, and I’m better off getting the current version anyway.
/mnt/path-inside-jail/Downloads
/mnt/path-inside-jail/Installers/*.dmg
Test your backups
You’ll have to do this from inside the backups jail you created. ssh to your server, then run sudo iocage console YOURJAILNAME
I recommend you set BACKUPS_PATH in your settings file to a single small directory to make your testing faster. You can change it to the path to your full directory tree once you confirm your backups and restores are working as expected.
Initialize your backup repository
Now that you’re inside the jail, you’re going to have to initialize the repository directory in your B2 bucket. FreeBSD/TrueNAS uses csh as the default root shell, but our settings file is set up for bash, so start by running exec bash to get a decent shell.
Load the configuration file you created by running source /path/to/yoursettingsfile.sh, then run restic init.
You’re ready to do a backup.
Run a backup
Now that your repository has been initialized, run /path/to/restic-driver /path/to/yoursettingsfile.sh
It shouldn’t take long if you used a small test subdirectory.
Test a restore
First, let’s look at the list of snapshots with restic snapshots.
Now we can list the files in the snapshot with either restic ls SNAPSHOTID or restic ls latest
Pick a file and restore it.
- Make a directory to restore to -
mkdir ./restores - Restore the file. We don’t want to restore the entire snapshot, just a specific file/directory, so we’ll use
--includeand runrestic restore latest --target ./restores --include /mnt/path/to/file - It put the whole directory path for that file inside
./restores, so we’ll do a simple md5 check withmd5sum /path/to/test/file ./restores/path/to/test/file
Run restic out of cron
Great, you’re almost done. All we have to do now is add it to cron so it runs at least once a day. You need to add it to the crontab inside the jail though, or TrueNAS won’t find your script.
I stored my restic backup script and configuration in a directory that appears as /mnt/alcatraz inside my backups jail. Change the path to match wherever you stored yours.
Run crontab -e and add the following:
# minute	hour	mday	month	wday	command
13 */4 * * * /mnt/alcatraz/restic-driver /mnt/alcatraz/backup-settings.sh | logger -t backups
I tagged all the log output with backups to make it easier to grep out of /var/log/messages, and I run mine four times a day. You may prefer a different cadence, if so set the hour field accordingly. restic locks the repository when it starts, so you don’t have to worry about repository corruption if you accidentally try to run more than one backup at a time, or one runs so long that it isn’t complete before the next run starts.
Update: Jesse Alter wrote a perl version of this script, you can find it on GitHub at jessealter/restickit.