I’ve been experimenting with running Talos in my home lab. I really like the idea of an immutable OS layer under Kubernetes and wanted to stand up a cluster to run some of my services that are currently run with docker-compose.
I decided to use my Synology to store k8s volumes, here’s how I set that up.
I have a Talos cluster running in my proxmox cluster. Because it’s immutable and is managed via API calls with talosctl, using the Synology isn’t as simple as sshing to a kubernetes node and configuring it to automount a filesystem.
Pre-requisites
helm&talosctl. I installed them on my M3Book withbrew, but you can get other install instructions at helm.sh and the Sidero Labs website- An NFS server. I’m using my Synology for this post and including setup instructions for it. There are are many tutorials out there for setting up NFS on Linux so that’s out of scope for this post.
- A working Talos cluster. I used a single-node cluster to validate these instructions. I wrote Setting up Talos with a Cilium CNI on proxmox with instructions to set one up.
The NFS server on my Synology grants access based on the IP of the client machine. I recommend that you either configure your DHCP server to always assign your talos cluster nodes the same IP or assign a static address in your Talos cluster configuration. I prefer to do it on my DHCP server so there’s a single source of truth for IP address assignments in my homelab.
Software Versions
I’ve found it frustrating when I go find a technical post and can’t tell what versions of software they were using, so here are the versions of the software I used while writing this post.
| Software | Version |
|---|---|
helm |
4.0.1 |
kubectl |
1.34 |
talosctl |
1.11.5 |
talos |
1.11.5 |
proxmox |
9.0.3 |
| Synology DSM | 7.2.2 |
Set up a NFS share
On my Synology, I went to Control Panel -> Shared Folder and created a new shared folder talos-nfs, and enabled NFS on it. Keep track of the complete path to the folder (in my case /volume2/talos-nfs), you’re going to need it later.
I also created a second share, talos-nfs-retains that I’m going to use for a separate storageClass with a reclaimPolicy of Retains. This one’s path is /volume2/talos-nfs-retains.
Go to the NFS Permissions tab and create an access rule that allows connections from your talos node’s IP address.
It’ll look something like this:
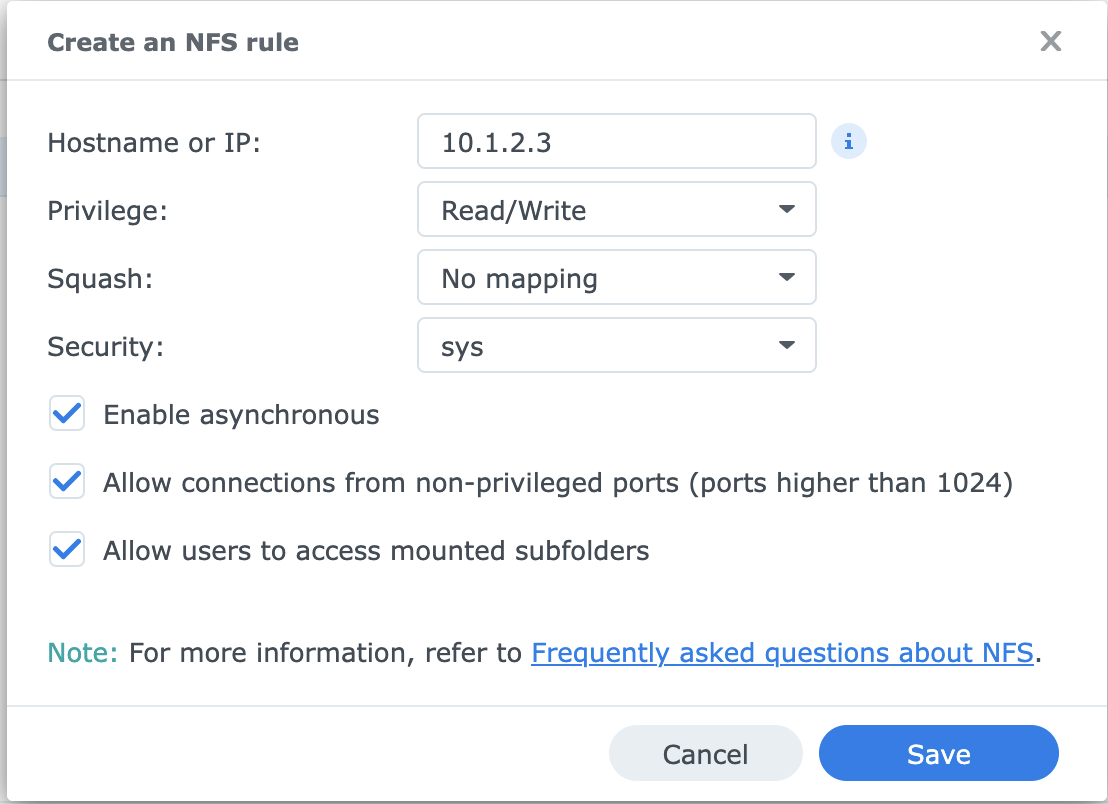 Put in the IP address of your talos node. I checked all three of the optional boxes -
 Enable asynchronous, Allow connections from unprivileged ports and Allow users to access mounted subfolders.
You could put in the entire /24 (10.1.2.0/24 in my example) but I don’t recommend it for security reasons. Yes, it’s a homelab and you should trust the other machines on your network, but assigning wide-open access to things “just to get it running” is a really bad habit to get into. Do it right, not right now.
Install nfs-subdir-external-provisioner
We’re going to use helm to install nfs-subdir-external-provisioner. I prefer using NFS to iSCSI because then any files the pods write are regular files in a directory tree on the server. This lets me use restic to back them up like I do with my other shares, and I can also move files in or out of the NFS volume without having to crack open an iSCSI volume.
Depending on your workload it can be a little slower than iSCSI, but my homelab services only have to support two users. Ease of backup is more of a priority for me than performance is.
Add the helm repository
We’re going to use helm to install the provisioner, so to get started, install the helm repository and run helm repo update.
helm repo add nfs-subdir-external-provisioner https://kubernetes-sigs.github.io/nfs-subdir-external-provisioner \
  && helm repo update
Install the provisioners
My Synology has two bonded ports on 10.0.1.108. nfs.path should be the path being exported from the nfs server, you don’t have to care where talos mounts it.
The default storage class name is nfs-client). I’m using --set storageClass.name=different-nfs-client-name in the helm command below to specify names that are clear about the reclaim policy.
I don’t want to accidentally create any volume claims locally if I forget to specify a storageClass, so I made this the default storageClass for my cluster. Remove the --set storageClass.defaultClass=true argument if you want something else for your default.
export NFS_SERVER_IP=YOUR_SERVERS_IP
helm install nfs-provisioner-deletes \
  nfs-subdir-external-provisioner/nfs-subdir-external-provisioner \
  --set nfs.server=$NFS_SERVER_IP \
  --set nfs.path=/volume2/talos-nfs \
  --set storageClass.reclaimPolicy=Delete \
  --set storageClass.defaultClass=true \
  --set storageClass.archiveOnDelete=false \
  --set storageClass.name=nfs-client-deletes \
  --set storageClass.onDelete=delete
I also added a second storageClass, this time with the reclaimPolicy set to Retains
helm install nfs-provisioner-retains \
  nfs-subdir-external-provisioner/nfs-subdir-external-provisioner \
  --set nfs.server=$NFS_SERVER_IP \
  --set nfs.path=/volume2/talos-nfs-retains \
  --set storageClass.name=nfs-client-retains \
  --set storageClass.reclaimPolicy=Retain
Confirm that the install succeeded
Check your pods and storage classes with kubectl.
$ kubectl get pod
NAME                                                              READY   STATUS    RESTARTS   AGE
nfs-provisioner-retains-nfs-subdir-external-provisioner-bc7f6tp   1/1     Running   0          11m
nfs-subdir-external-provisioner-745688c67-c27mg                   1/1     Running   0          21m
$ kubectl get sc
NAME                           PROVISIONER                                                             RECLAIMPOLICY   VOLUMEBINDINGMODE   ALLOWVOLUMEEXPANSION   AGE
nfs-client-deletes (default)   cluster.local/nfs-subdir-external-provisioner                           Delete          Immediate           true                   22m
nfs-client-retains             cluster.local/nfs-provisioner-retains-nfs-subdir-external-provisioner   Retain          Immediate           true                   12m
It only took a few seconds for the provisioner pod to come ready. If the provisioner pod never comes ready, check that you have the right IP address in your NFS permissions on the server side, not just the cluster - when I first set this up I put a .15 where it should have had a .51.
Once the nfs-subdir-external-provisioner pod is ready, we can start testing it.
Test NFS on talos
Create a dynamic PVC
Create the a yaml file describing the test PVC, debian-tester-pvc-deletes.yaml
# debian-tester-pvc-deletes.yaml
apiVersion: v1
kind: PersistentVolumeClaim
metadata:
  name: debian-test-pvc
spec:
  accessModes:
    - ReadWriteOnce
  storageClassName: nfs-client-deletes
  resources:
    requests:
      storage: 5Gi
Create the PVC with kubectl.
kubectl apply -f debian-tester-pvc-deletes.yaml
Create a debian deployment that uses the new PVC
Create a yaml file for a debian test deployment that attaches the test pvc, debian-pvc-test-deployment.yaml
# Toy debian deployment
apiVersion: apps/v1
kind: Deployment
metadata:
  name: debian-tester-deployment
spec:
  replicas: 1
  selector:
    matchLabels:
      app: debian-tester
  template:
    metadata:
      labels:
        app: debian-tester
    spec:
      containers:
      - name: debian-tester-container
        # Use a standard Debian image
        image: debian:stable
        command: ["/bin/bash", "-c", "echo 'Data created in PVC' > /mnt/data/testfile.txt; while true; do sleep 30; done;"]
        # Mount the volume named 'persistent-storage' to the container path '/mnt/data'
        volumeMounts:
        - name: persistent-storage
          mountPath: /mnt/data
      volumes:
      - name: persistent-storage
        persistentVolumeClaim:
          claimName: debian-test-pvc
And deploy it with
kubectl apply -f debian-pvc-test-deployment.yaml
Confirm our deployment succeeded
We should now be able to see our deployment:
$ kubectl get deployment
NAME                                                      READY   UP-TO-DATE   AVAILABLE   AGE
debian-tester-deployment                                  1/1     1            1           25s
A running pod for it:
kubectl get pod
NAME                                                              READY   STATUS    RESTARTS   AGE
debian-tester-deployment-77ddd68557-qvcrk                         1/1     Running   0          2m24s
And finally get a shell in the running pod:
# Use the pod name from kubectl get pod, in this case
DEBIAN_P=debian-tester-deployment-77ddd68557-qvcrk
kubectl exec $DEBIAN_P -it -- bash
root@debian-tester-deployment-77ddd68557-qvcrk:/#
Inside the pod, we can now cd /mnt/data and create some files as a test
cd /mnt/data
echo "Success" > pvc-test
root@debian-tester-deployment-77ddd68557-qvcrk:/mnt/data# ls
pvc-test  testfile.txt
Confirm it on the NFS server side
ssh into your NFS server and cd into the directory you shared. In my case, the NVS volume is /volume2/talos-nfs and we can see a directory for the pvc.
cd /volume2/talos-nfs
ls
#recycle
@eaDir
default-debian-test-pvc-pvc-e6cf5df1-90c8-4962-97bb-91ae795945bc
/volume2/talos-nfs $ cat default-debian-test-pvc-pvc-e6cf5df1-90c8-4962-97bb-91ae795945bc/pvc-test
Success
/volume2/talos-nfs $
Persistence test
Delete the deployment.
kubectl delete deployment debian-tester-deployment
Create the deployment again.
kubectl apply -f debian-pvc-test-deployment.yaml
Find the new pod with kubectl get pod, and get a shell in it. You’ll see the files you created in /mnt/data
Clean up
Delete the deployment
kubectl delete deployment debian-tester-deployment
Delete the pvc
kubectl delete pvc debian-test-pvc
The subdirectory on your NFS server should be gone - ssh in and confirm
cd /volume2/talos-nfs
ls
#recycle
@eaDir
/volume2/talos-nfs $
And with that, NFS setup is done.