In part five of my kubernetes homelab series, we will install Argo CD into a homelab cluster so we can use gitops practices instead of ad-hoc kubectl commands.
This will make it much easier to recreate the cluster exactly if we decide to move it to new hardware or just want to reset things to a known-good state after experimentation.
- Part 1 - Setting up Talos with a Cilium CNI on proxmox
- Part 2 Add SSL to Kubernetes using Cilium, cert-manager and LetsEncrypt with domains hosted on Amazon Route 53
- Part 3 - Secret Management with SOPS
- Part 4 - Back up your Talos etcd cluster to a SMB share
- Part 5 - Install Argo CD
- Part 6 - Install MQTT into a k8s cluster
- Part 7 - Add an ArgoCD git generator ApplicationSet
- Part 8 - Add Traefik to the cluster
Why bother with gitops? It’s a homelab, and I’m the only administrator
Using gitops to configure your cluster instead of running kubectl apply commands directly makes it possible to reproduce the exact state of the cluster later if you need to revert to a known-good state.
In a non-homelab environment, using gitops allows you to have a history of who made what changes when, easily control who can change which environments and to reproduce the same state in multiple clusters running in different data centers.
In our homelab environment, running kubectl apply commands directly makes it nearly impossible to reproduce the exact state of the cluster later if you need to revert to a known-good state. By using gitops powered by Argo CD, you can revert your configuration git repository to a known-good tag or commit, and Argo will automatically bring the cluster back to that state.
Even if you’re the only one administering the cluster, it’s a good habit to get into - unless you’re very unlucky, work environments will require changes to production clusters to be done via some form of gitops for change management.
Goals
In this post we will install Argo CD into our homelab cluster and configure it to manage itself.
Software Versions
Here are the versions of the software I used while writing this post. Later versions should work, but this is what these instructions were tested with.
| Software | Version |
|---|---|
argocd |
3.2.6 (chart 9.4.8) |
helm |
4.0.1 |
kubectl |
1.34 |
kubernetes |
1.34.1 |
talos |
1.11.5 |
Pre-requisites
To follow along with this post, you will need:
- A homelab kubernetes cluster. I’m using the talos cluster from Part 1 - Setting up Talos with a Cilium CNI on proxmox, but this will work with any kubernetes cluster.
- A GitHub account. You can also use GitLab or your own
gitserver, but all the examples in this post assume you’re storing your Argo CD repository on GitHub. - The
argocdcommand line tool. Either install it withbrew install argocdor follow the argocd install instructions page. - If you’ve been following along with this series, you already have
helmandkubectl. Otherwise you canbrew installthem or follow the install instructions at helm.sh and kubectl.
Goals
We’re going to bootstrap ArgoCD by installing it with helm, then we’ll aad it to its own configuration repository so we can do future upgrades with git.
Installation
Add the helm repository
We’re going to do our initial bootstrap with helm, so first add the argo helm repository.
helm repo add argo https://argoproj.github.io/argo-helm
Find the latest chart version
We want to extract the default values from the helm chart, so first run
helm search repo argo/argo-cd
As I’m writing this, the current chart version is 9.3.7
$ helm search repo argo/argo-cd
NAME        	CHART VERSION	APP VERSION	DESCRIPTION
argo/argo-cd	9.3.7        	v3.2.6     	A Helm chart for Argo CD, a declarative, GitOps...
Now we can extract the defaults and see what we want to change
helm show values argo/argo-cd --version 9.3.7 > values.yaml
Create argo-values.yaml
In this post, we’re going to use all defaults except for server.insecure, so put this into argo-values.yaml
configs:
  params:
    server.insecure: true
Bootstrap Argo CD with helm
Now we can bootstrap Argo CD. Why helm upgrade --install instead of helm install? If you have an old version of a chart installed and run helm install, you get an error. helm upgrade --install works whether or not the chart is already installed.
helm upgrade --install argocd argo/argo-cd \
  --version 9.3.7 \
  --values argo-values.yaml \
  --namespace argocd --create-namespace
Confirm the install
Depending on the horsepower of your k8s nodes, it can take a few minutes for argocd’s install to complete. Run kubectl get pod -n argocd until all the pods show that they’re ready - it should look similar to this:
$ kubectl get pod -n argocd
NAME                                                READY   STATUS    RESTARTS       AGE
argocd-application-controller-0                     1/1     Running   0              4m25s
argocd-applicationset-controller-5f6775c8f7-pc6mt   1/1     Running   0              4m23s
argocd-dex-server-7c454cdd97-x7b2g                  1/1     Running   2 (4m5s ago)   4m25s
argocd-notifications-controller-6485c849d7-9s6zq    1/1     Running   0              4m25s
argocd-redis-6cf948f6d6-vqjx8                       1/1     Running   0              4m25s
argocd-repo-server-5b584fdbb8-pr6lg                 1/1     Running   0              4m25s
argocd-server-849bd4596-b52z4                       1/1     Running   0              4m25s
Create a GitHub token
Argo CD reads its configuration from git repositories, so it needs a token to read your private repositories. These instructions were valid as on 2026-02-01. You don’t need to create a token if you’re only going to use public git repositories.
- Go to GitHub and select
Settings, thenDeveloper Settingsat the bottom of the sidebar on the left - Select
Fine-grained-tokens, thenGenerate new tokenat the right side of the page. - Give it a token name and description, then set an expiration time
- Time to decide on Repository Access level. I picked
All repositories, but you can restrict it to just public repositories or even specific repositories - Click the
Add permissionsbutton and grantContentspermission, then specify access - I didn’t want there to be any chance of it changing things behind my back so I gave itRead-onlyaccess.
Connect to your Argo CD instance
Before you connect to the web ui, you need to find the random password generated for the admin user when ArgoCD was installed.
kubectl get secret argocd-initial-admin-secret -n argocd \
  -o jsonpath="{.data.password}" | base64 -d
Set up an HTTPRoute for argocd
For quick debugging, you can use port forwarding to connect to Argo’s web UI.
kubectl -n argocd port-forward svc/argocd-server 8080:80 8443:443
Now you can log into https://localhost:8080
Long term though, it’s cleaner to add an HTTPRoute.
If you followed part 2, you have cert-manager set up in your cluster and a default Gateway. Here’s a HTTPRoute that will create an SSL certificate for argo.example.com and route any traffic to argo.example.com to your Argo CD.
apiVersion: gateway.networking.k8s.io/v1
kind: HTTPRoute
metadata:
  name: argo-ssl-route
  namespace: argocd
spec:
  parentRefs:
  - name: default-gateway
    namespace: default
    sectionName: https
  hostnames:
  - "argo.example.com"
  rules:
  - backendRefs:
    - name: argocd-server
      port: 80
Now you can open https://argo.example.com in your browser and have a secure SSL connection.
First, reset the password
Click User Info in the left sidebar
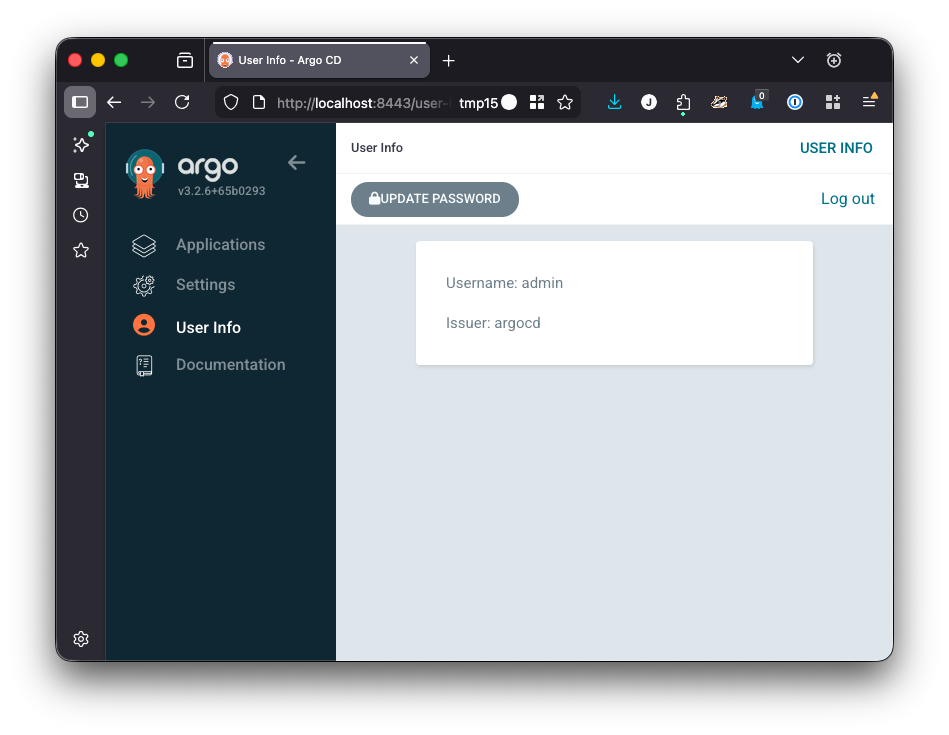
Once you’ve changed your password and added it to your password manager, you should delete the argocd-initial-admin-secret secret. It will be regenerated if you force a password reset in the future.
kubectl -n argocd delete secret/argocd-initial-admin-secret
Create an Argo CD chart
We want Argo to be able to update or roll itself back, so let’s create an app for it and add that.
Create the argocd application in your Argo CD configuration repository
Create git a repository for your Argo CD configuration. Add an argocd top-level directory to it.
We’re going to create a helm chart for it, so you’ll need to create three files in the argocd directory - Chart.yaml, Chart.lock, and values.yaml.
You can copy them from my bootstrap-argocd repository, or fork that repository.
Here are the manifest source files
Chart.yaml
# Chart.yaml
apiVersion: v2
name: argocd
description: Argo CD Helm Chart
type: application
version: 9.3.7
dependencies:
- name: argo-cd
  version: 9.3.7
  repository: https://argoproj.github.io/argo-helm
Chart.lock
# Chart.lock
dependencies:
- name: argo-cd
  repository: https://argoproj.github.io/argo-helm
  version: 9.3.7
digest: sha256:688d3b74c5750ef87ff3cafd13b5879c8e7cda7be17ab252a289f3c24591ff0b
generated: "2026-01-28T00:02:16.172701-07:00"
values.yaml
You could specify all the values you got when you ran helm show values argo/argo-cd --version 9.3.7 > values.yaml, but I prefer to only override the values I care about. If other values change in future versions, I want them automatically updated when I update argo.
---
# values.yaml
argo-cd:
  nameOverride: argocd
  configs:
    params:
      server.insecure: true
Commit all the files, then push to GitHub.
Make ArgoCD manage itself
For these instructions, I’m going to use an example repository I set up on GitHub. Replace this url https://github.com/unixorn-exemplars/bootstrap-argocd.git with your repository url.
Add a new argocd app
With Manifest files
Create a argocd-values.yaml file
First, create a argocd-values.yaml in your configuration repository for the settings for your Argo install.
# argocd/infrastructure/argocd/argocd-values.yaml
configs:
  params:
    server.insecure: true
Commit it and push it to your configuration repo
git add argocd-values.yaml && \
  git commit argocd-values.yaml -m "Add values file for ArgoCD" && \
  git push
Create the ArgoCD Application manifest
We’re going to create a multi-source ArgoCD Application. The first source will be the helm chart we used to install ArgoCD and the second source will be your configuration git repository.
This example assumes you put argocd-values.yaml in argocd/infrastructure/argocd/argocd-values.yaml
# argocd/infrastructure/argocd/argocd.application.yaml
apiVersion: argoproj.io/v1alpha1
kind: Application
metadata:
  name: argocd
  namespace: argocd
spec:
  project: default
  sources:
    # Source 1: The official helm chart for argo
    - repoURL: https://argoproj.github.io/argo-helm
      chart: argo-cd
      targetRevision: 9.4.8
      helm:
        valueFiles:
          - $values/argocd/infrastructure/argocd/argocd-values.yaml

    # Source 2: Your configuration repository
    - repoURL: https://github.com/YOUR_USERNAME/YOUR_CONFIGURATION_REPO.git
      targetRevision: main
      ref: values

  destination:
    server: https://kubernetes.default.svc
    namespace: traefik

  syncPolicy:
    automated:
      prune: true
      selfHeal: true
    syncOptions:
      - CreateNamespace=true
      - RespectIgnoreDifferences=true
      - ServerSideApply=true
Now, add it to the repo and apply it to the cluster
git add argocd.application.yaml && \
  git commit argocd.application.yaml -m "Add Application manifest for ArgoCD" && \
  git push && \
  kubectl apply -f argocd.application.yaml
You should see a new Application tile for Argo CD appear. It may take a minute or two for it to finish syncing and take over the resources that you added earlier when you installed Argo with helm.
With the GUI
And here’s how to do it with the web UI. I’m including this for completeness - I prefer to use a manifest so that everything is in git and easily reproducible if I want to spin up a test cluster.
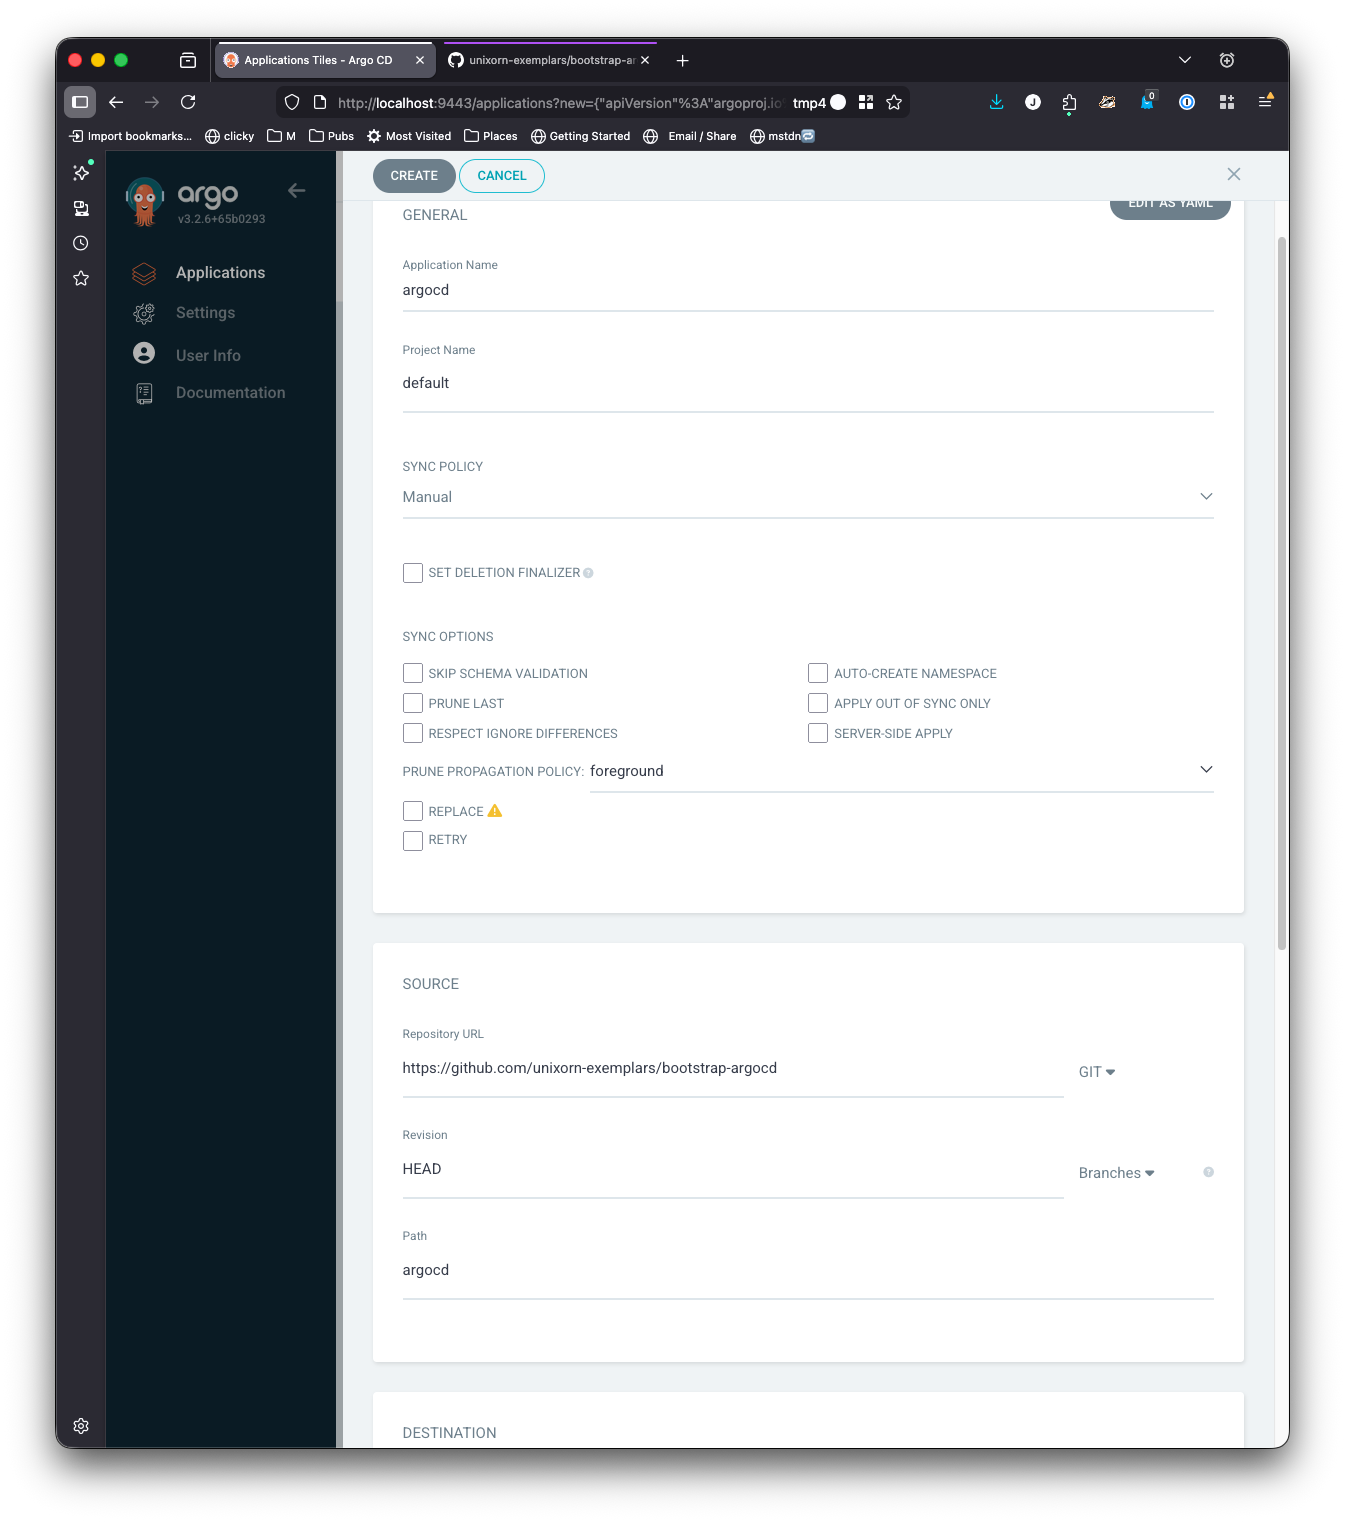
Log into your Argo CD instance and select New App from the upper left corner of the UI.

- Set the Application name to
argocd - Select
defaultfrom theProject Namedropdown menu - Leave the Sync policy as
Manualfor now - Set the repository url to
https://github.com/unixorn-exemplars/bootstrap-argocd.git - Leave the revision as HEAD
- Set the path to argocd
- Since we’re running Argo on the same cluster we want to manage, set the cluster URL to
https://kubernetes.default.svc - Set the namespace to
argocd. We want to use the same namespace that we hadhelminstall argo into so that when we sync, it reuses the same resources that were installed byhelminstead of making new ones. - Click create.
It should look similar to this:
If your configuration repository is a private repository, you will have to add your GitHub username and set the password to the PAT you created earlier.
Click Create.
Syncing the App
Right now your app has been added, but until you sync it, it won’t be active. You should see
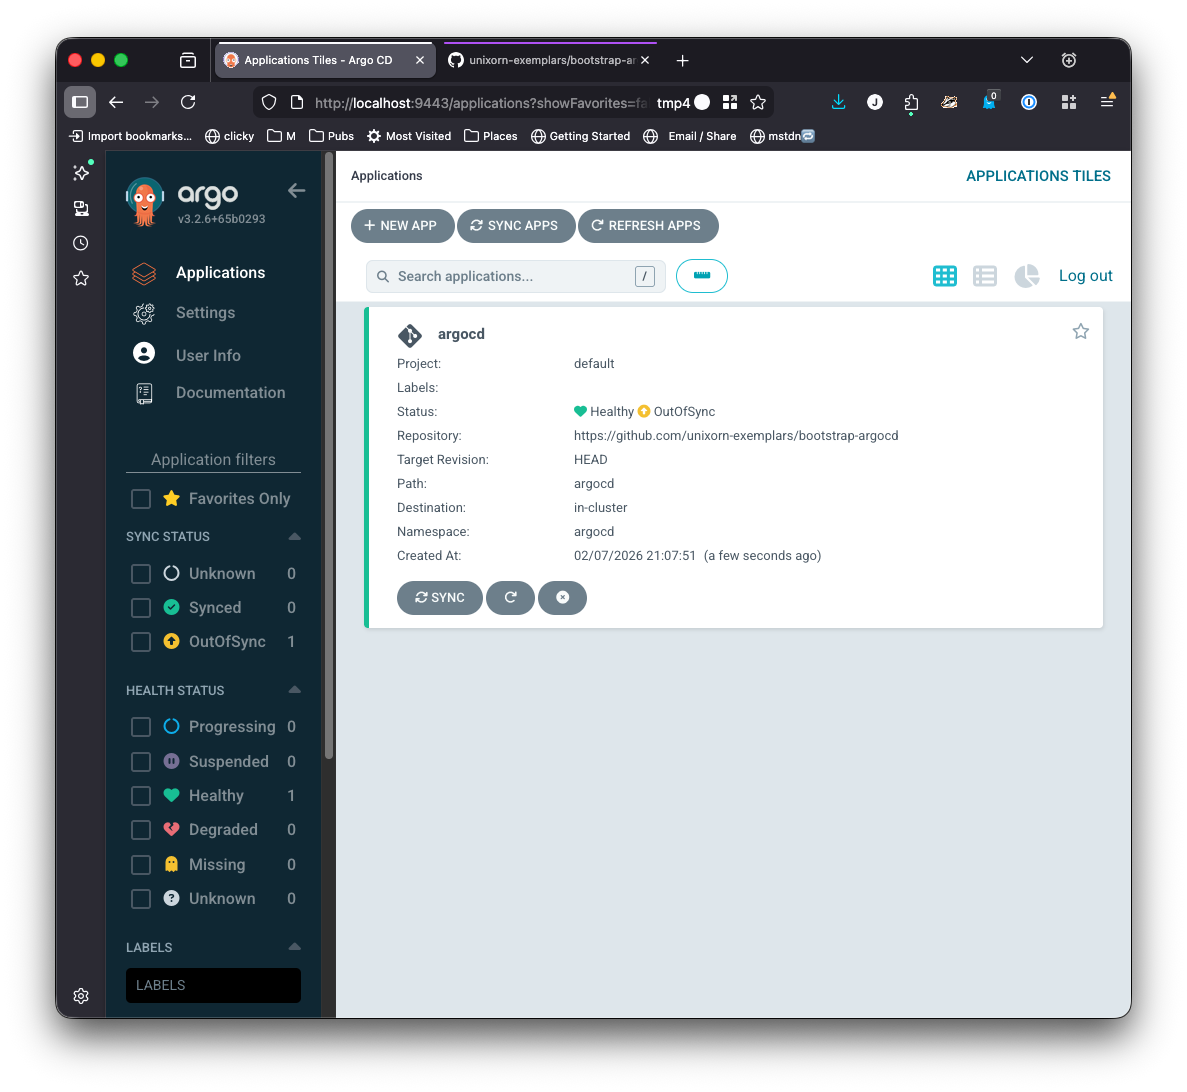
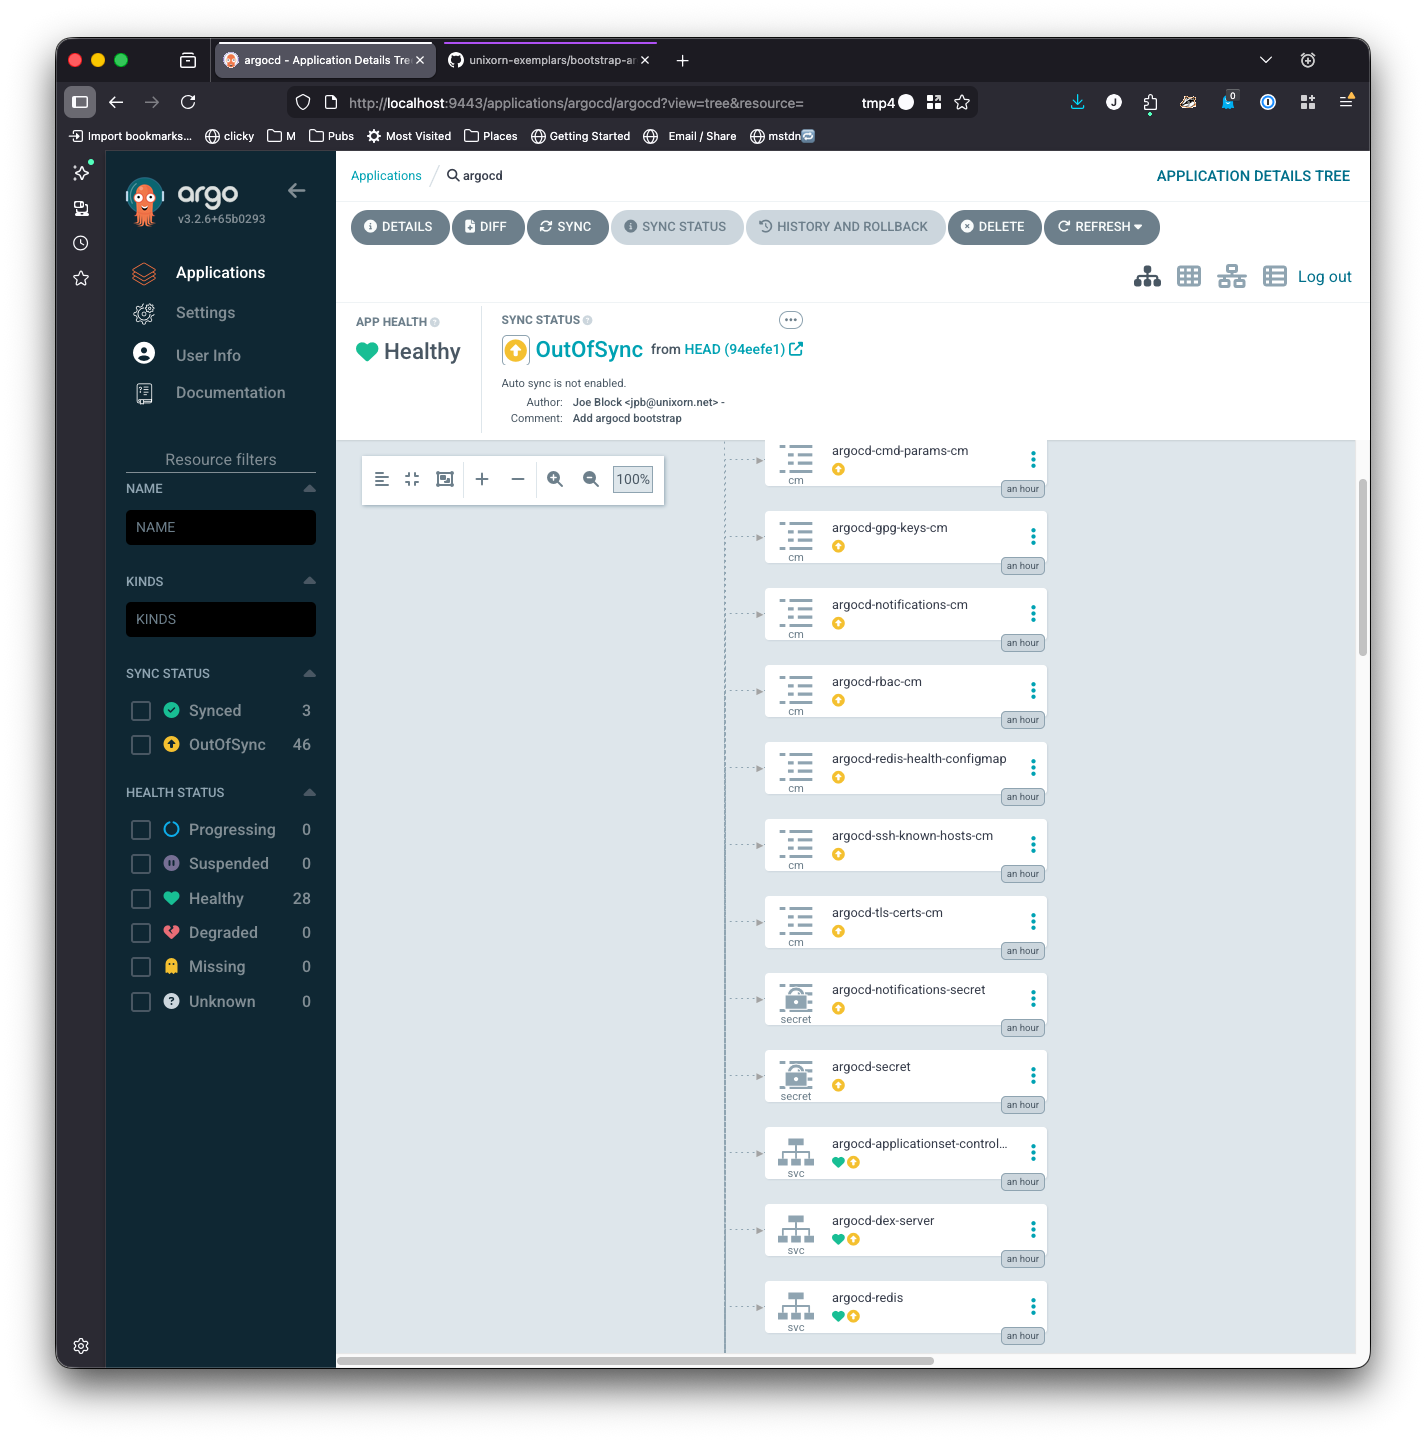
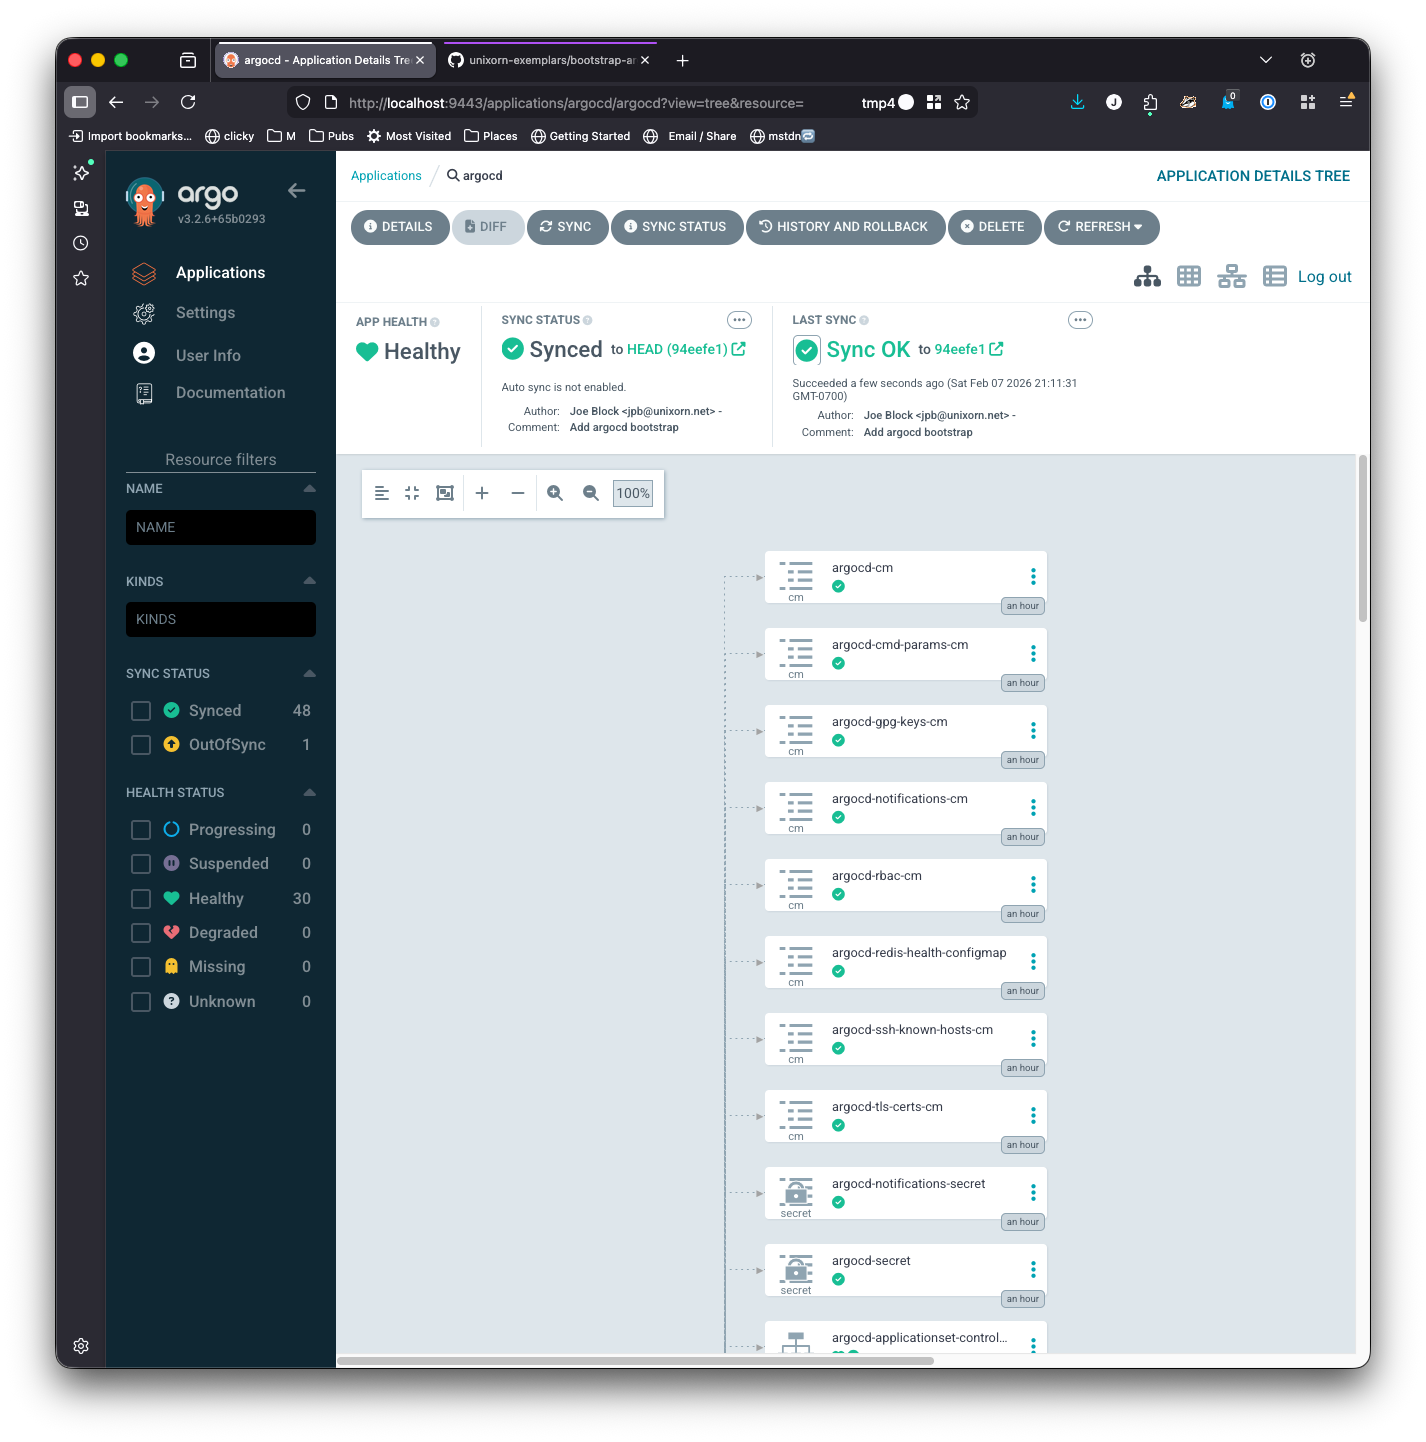
If you click on the app tile, it’ll show you a detailed map of what resources the app creates
Go ahead and click Sync.
Because you’ve already installed argo with helm, the resources already exist and it should only take a few seconds to show that it is synced.
Enabling automatic syncing
One last thing to configure - right now, Argo will only sync when you explicitly tell it to. That’s not much good for gitops though, we want argo to detect when changes are merged to main and apply them to the cluster automatically.
Click details, then scroll down to the bottom of the panel until you see sync policy
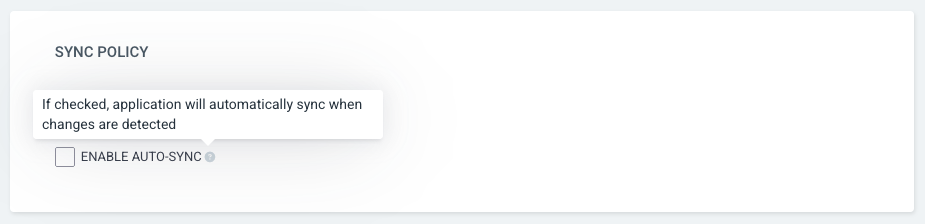
Enable auto-sync, then select Prune Resources and Self Heal, and save. By default, Argo CD checks every 120 seconds, with a random offset of up to 60 seconds to prevent simultaneously polling multiple apps at once.
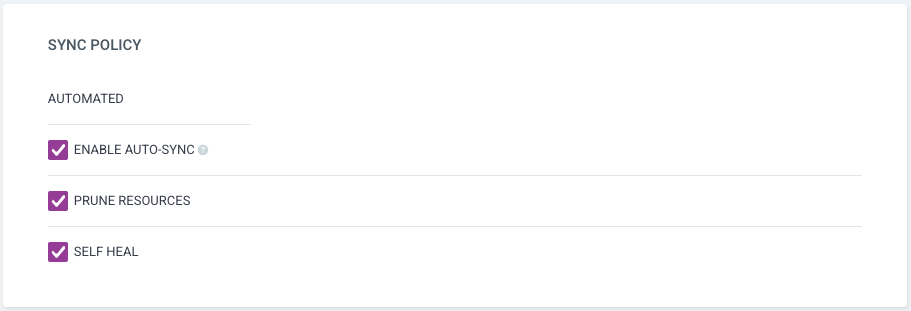
Prune Resources tells argo that if a new version of the app no longer includes a resource, that resource should eb deleted during upgrade.
Self Heal tells argo that whenever it detects a deviation from the app’s configuration, it should correct it - not only during upgrades, all of the time.
Summary
You have:
- Installed Argo CD in your cluster so that you can use it for gitops practices
- Set up an
HTTPRouteso you can securely access your Argo CD instance with SSL - Created a configuration GitHub repository you can use with Argo CD to install and configure apps in your cluster
- Created an
argocddirectory in that GitHub directory - Configured Argo CD to use the
argocdapp in your repository to manage itself - Configured Argo CD to automagically correct any deviation from the spec defined in the
argocddirectory